The story of a fast and loose NFT case study.
The truth is, when we tasked our copywriter, Louisa Penny, to write this series of articles she didn’t know much about tokens, whether fungible or non. Louisa decided to jump straight in and create some NFTs of her own to get to grips with the whole process.
“As I was researching this article there was too much that I didn’t understand on a practical level. Although I had a basic understanding of blockchain and cryptocurrency, I hadn’t used either before. I was hearing other words like ‘gas prices’ (which has nothing to do with queuing up at the petrol station), so I thought I’d bite the bullet and try to make an NFT myself.”
Here is Louisa’s NFT Story
Step 1: Create an NFT
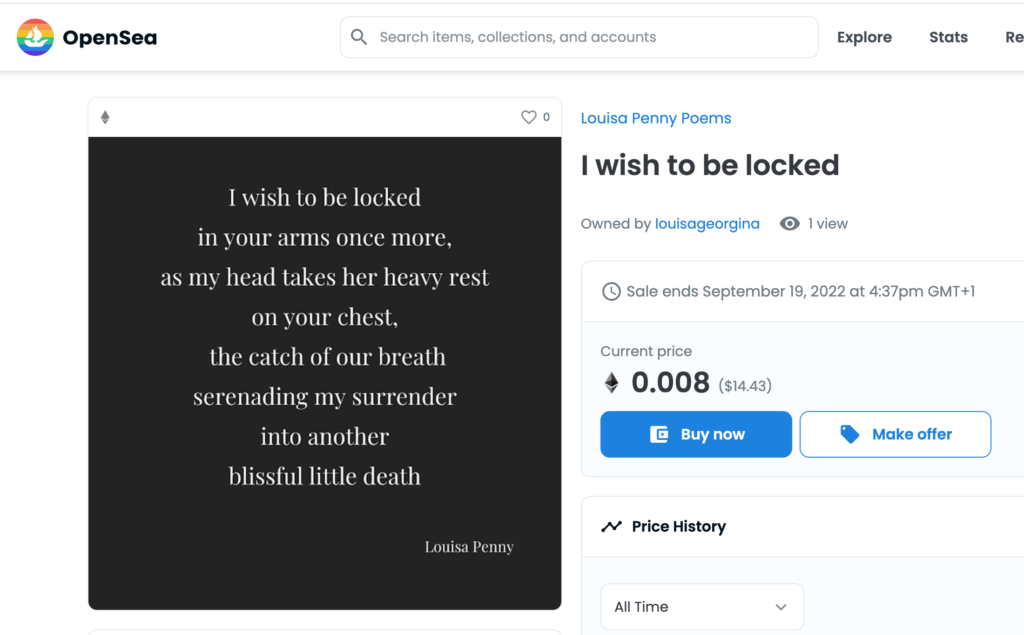
Arguably the most time-consuming and difficult part of the process of NFT’s is making one. Luckily I had some flash poetry in my back catalogue that I had created in Canva a while ago, so I dusted them off and used one of them in my great NFT experiment. As I already had a token (my poem) to use, the next thing I had to do was open a crypto wallet.
Step 2: Get a Crypto Wallet
I chose Meta Mask, not just because of the amusing way the fox face moves as you scroll, MetaMask is an uncomplicated browser extension that works as a wallet service for Ethereum and other Ether-based crypto tokens. It was really quick and easy to create a wallet, I was ready to enter the world of cryptocurrency for the first time…still with zero clue what I was doing.
Step 3: Enter the NFT marketplace
I then created an account with OpenSea, the world’s first and largest NFT marketplace. This is basically an online gallery or shop where you can view, buy and sell NFTs. OpenSea connects with my MetaMask wallet, so the whole process is seamless. So far so easy.
Step 4: Upload your NFT
Creating an NFT on OpenSea is easy. Simply select “Create” and upload your Image, Video, Audio, or 3D Model, and complete a series of options. The next part is to mint your NFT.
Step 5: Get some Gas and Mint your NFT
From OpenSea:
“Minting is an action that brings an item into existence on the blockchain and costs gas to do so. Minting using OpenSea’s tools is lazy, meaning it only occurs when necessary:
- When you transfer an item to another account
- When someone buys an item from you
This means that you can create as many NFTs as you want here for free.”
This was the section that confused and cost me money! At this point, I had to put some actual money in my crypto wallet – of course, if you already have some you can use existing Ether or other currency – in order to “mint” my NFT. This costs ‘gas’ which OpenSea describes as:
“Gas fees are transaction fees paid to miners on Ethereum. OpenSea does not receive these fees and is not able to refund them. OpenSea also doesn’t control gas prices nor does it profit from them.
When you pay for gas fees, the payment only guarantees your transaction to be processed. It does not guarantee that the transaction will succeed.
This is because gas prices on Ethereum fluctuate widely. If there is a high level of activity on Ethereum – for example, a popular NFT collection is being released – gas prices will rise due to network congestion. In this case, the original gas fee you paid may no longer be high enough for miners to process and confirm the transaction.”
Depending on how busy Ethereum is at the time of minting can depend on how much it costs you. I sat and waited until the cost went down to within my budget. The great thing about OpenSea is you only pay the gas price once to initially mint your NFTs, meaning you can load as many as you like after the first one at no cost. When the NFT is bought, you will then pay the 2.5% fee. You can’t sell your NFT on Open Sea until you have paid an initial gas price.
Step 6: Sell your NFT
The next step is to sell your NFT. Here you can choose whether your token has a fixed price or you can sell it at auction. Choosing the price of your NFT is also difficult. You can look at other NFTs to get an idea of the market – or totally wing it and make it up as I did. The other option is to see your NFT at Timed Auction.
I would recommend uploading a few NFTs at a time so you can build a collection. It doesn’t cost a gas price each time, so you may as well list as many as you can.
Step 7: Share on Socials
The next step is to tell the world, and hope someone wants to buy your NFT! Sharing your tokens on social media is the most effective way to do this, with Twitter and Instagram being the most popular ways to share NFTs.
Step 8: Wait
That’s it. You can keep adding to your collections and keep an eye on trends and the NFT marketplace – which is fascinating – on OpenSea.
Next…
Our next article in the NFT series focuses on how NFTs fit within the creative industries as a whole and the various sectors that have embraced them.